In preparation for an upcoming show in August at the Philadelphia Sketch Club, I decided to stretch some new canvases the old school, traditional way. It's really linen but everyone has no clue what I am talking about when I say stretching linens. Maybe they think I was talking bed sheets? I used to prepare all of my "canvases" this way, and stopped for a couple of years. But, I wished to paint these on a really great surface and, so, I dusted off the stapler, pulled out the cooking pot and purchased some fresh rabbit skin glue and oil-based primer for painting on linen.
Here are the steps for the month-long process of stretching one's own canvases or linen.

1.First, I prep the stretchers. I make sure they are square and that the corners are flush. If one corner is not flat I will get out the chisel and sandpaper and flatten the corner. If I do not do this then the canvas will wrinkle in the corner.

2. Before I begin stapling, I precut the linen approximately 3-4 inches larger than the stretchers. This allows me to staple the linen to the stretchers in this somewhat unconventional way. I make sure that there is some slag in the linen. This is very important because the glueing process will stretch the linen so tight that it can warp the stretchers, making the linen worthless to paint on.

Because this process, from start to finish, takes at least a month to complete,
I prepare as many linens as I can fit (or afford) laying flat, in my workspace
3. After all of the linens are stapled, I begin to cook the rabbit skin glue (I don't know if the stuff is really from rabbits and I'm leaving it that way) which comes in the form of crystals. When properly cooked the hot glue is liquid and easy to brush on. Almost immediately the linen will begin to tighten like a drum as the glue cools. Cover the pot of excess glue and place in the fridge for the second coat. As the excess glue cools it becomes jelly (Do not ingest, it not that kind of jelly.) After the first coat is dry, I slowly reheat and liquify the glue for the second coat, this time I coat the sides as well.

Once the second coat of glue dries (2 coats=approx. 1 day) I can begin the priming.
4. I prepare the oil primer (thick paste) into a liquid (like syrup) mixing in Mineral Spirits. Using a brush made for priming linens and canvases, I coat each linen with enough primer to cover well but not so much as to leave brush strokes. After 3-5 days the first coat will be dry and ready for a light sanding and a second coat. The more coats one puts on the linens, the smoother the surface. Personally, I put on 5-8 coats to achieve a very smooth finish.

I line the top of the excess oil primer paint with wax paper to avoid a skin from developing then cover the bowl, as well as the brush, with plastic wrap. Then, into the refrigerator. The cold will slow down the drying of the oil primer
(oil paint as well) to prevent the excess oil primer and brush from drying. Warn your roommates that it is not Brush-On Food!


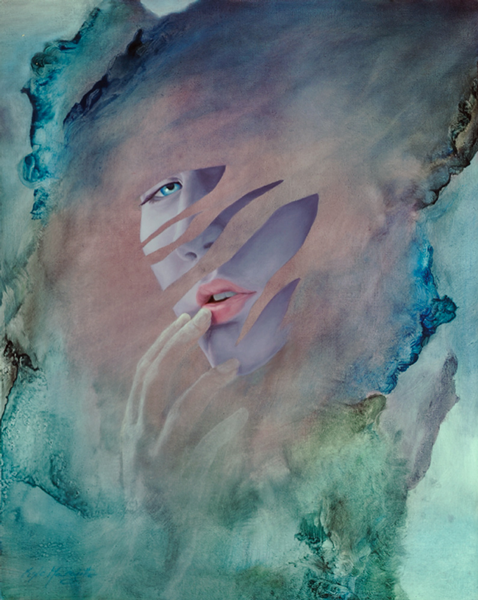


 The left photo shows the purplish brown glaze(thin transparent paint) applied over the red and white underpainting. The photo on the right shows the portrait 90% completed, opaque oil paint applied in the areas the the light has touched the face. I leave the glaze paint in the shadows untouched.
  This technique causes the light to appear more illuminating.
 above-Studies in facial expression and body language.
 Study of the pose with the shoulders down.

 Here is my color study, well it's more of a tonal study than a color study, but I did attempt to plan out what colors to use for atmospheric mood. This scan of this study is not very faithful to the actual study, but it doesn't matter, I will be altering the colors. More studies are needed.
 A few hours were devoted to developing heavy textures with soft textures, as well as the lights and darks of the "landscape." This is a fun painting to do. I have a vision in my head of what it should be. When I close my eyes, it is as clear as a glass of spring water. When I open my eyes, I am not clear of what I need to do to achieve my vision.
 A series of sketches for a concept not developing the way I want it to. I am just not thinking of or feeling a meaningful reason for the three dancers. Maybe I will return to original concept the center woman stood alone.
  (Above) The left sketch has freehand drawn (made up) hands and arms. The right sketch was completed after two models assisted me (thank you, Valerie and Deanne) in understanding what the human anatomy can't do. Before I transfer to my recently prepped linens, I think I will complete a third sketch combining certain details of the two sketches.
 The first of possibly many layers of paint.
 You know it's good stuff, if it has mold growing in it!
 My first attempt drawing with the ink. I attempted a loose drawing with bold washes. I achieved some unique effects, but I got too aggressive with the amount of ink I laid down and it got to be a little too unpredictable how dark the wash would dry. So I abandoned the drawing.


 2. Before I begin stapling, I precut the linen approximately 3-4 inches larger than the stretchers. This allows me to staple the linen to the stretchers in this somewhat unconventional way. I make sure that there is some slag in the linen. This is very important because the glueing process will stretch the linen so tight that it can warp the stretchers, making the linen worthless to paint on.

 I line the top of the excess oil primer paint with wax paper to avoid a skin from developing then cover the bowl, as well as the brush, with plastic wrap. Then, into the refrigerator. The cold will slow down the drying of the oil primer (oil paint as well) to prevent the excess oil primer and brush from drying. Warn your roommates that it is not Brush-On Food!


